Your bedroom is your personal sanctuary, but the centerpiece often looks like a deflated cloud after a rainstorm.
Walking into a room with flat, mismatched linens and sad, lumpy pillows is the ultimate aesthetic nightmare. It drains the energy right out of your space and makes the room feel unfinished.
However, a designer-styled bed is actually a sophisticated system that balances science and art. By using the professional five-layer foundation method, you can transform your bed into a sculptural landscape.
It is the first small victory of your day that lowers cortisol and makes luxury feel achievable every single morning.
1. Mattress Surface Engineering
The integrity of a designer bed is predicated on the quality of its invisible base layer. Professional styling begins not with the visible duvet, but with the mattress surface.
If your mattress feels more “meh” than magnificent, designers recommend adding a 2 to 4 inch mattress topper. This creates the “loft” or fluffiness necessary for the bed to appear puffed and inviting rather than flat and utilitarian.
For this year, there is a significant shift away from plain white foundations toward “Colorful Foundations.” Designers are now choosing fitted sheets in subtle tones like Jade or mineral blue to add a pop of color when the covers are folded back.
When applying your fitted sheet, ensure it has deep pockets (usually 16 inches) and full-perimeter elastic to prevent bunching.
A smooth, tight foundation is critical because any wrinkles at the base will be magnified by the layers you place on top.
| Foundation Element | Material Specification | Purpose |
| Mattress Topper | 2-4″ Down or Gel Fiber | Correcting firmness and adding loft |
| Fitted Sheet | Long-staple Cotton or Bamboo | Smooth, breathable skin-contact surface |
| Mattress Protector | Quilted Cotton | Hygiene and added plushness |
2. Flat Sheets and Hospital Corners
The flat sheet is a non-negotiable structural component for professional stylists. It provides a hygienic barrier and a clean horizontal “cuff” that anchors the entire design.
To achieve a high-end look, place the flat sheet on the mattress “wrong side up”. This ensures that when you fold the top edge back over your quilt, the decorative hem or finished side is what the eye actually sees.
The hallmark of a designer bed is the “hospital corner,” a tucking technique that creates a sharp, tailored appearance at the foot of the bed.
This is not just for looks: it ensures your sheets stay securely in place, preventing the tangled mess that often disrupts sleep.
In terms of thermal regulation, this layer acts as a primary moisture-wicking barrier, helping your body reach the ideal temperature for deep rest.
3. Texture Maxxing
The third layer is the intermediate blanket, also known as a quilt, coverlet, or matelassé. The trend is “Texture Maxxing”, the art of mixing different fabric finishes to add tactile depth.
Instead of relying on busy patterns, designers use the contrast between a smooth sateen sheet and a raised, quilted matelassé to create visual interest.
When styling this layer, many professionals use the “Rule of Thirds”. You can pull the quilt all the way to the head of the bed and fold it back with the flat sheet, or place it only on the bottom two-thirds of the bed to let your “colorful foundation” peek through at the top.
This layer is your thermal bridge: in summer, it might be all you need, while in winter, it traps warm air beneath the duvet.
4. Volumetric Mastery
The duvet is the “star of the show,” providing the volume that makes a bed look impossibly cozy. A common pro secret is to “size up” your insert: for a Queen bed, many stylists use a King-sized insert inside a Queen cover.
This creates “compression loft,” forcing the down or fiber fill to puff outward and look much fuller.
The placement of the duvet is what separates an amateur bed from a professional one. Instead of pulling it flat to the pillows, use the “fold-back” or “tri-fold” technique.
Fold the duvet back one-third of the way toward the foot of the bed. This accomplishes three goals: it exposes your beautiful lower layers, creates a series of visual “steps” that add depth, and provides a dedicated landing spot for your decorative pillows.
5. Mathematical Pillow Arrangements and the Sizing Secret
Pillow styling is often where a beautiful bed can start to look cluttered or “tired.” To avoid this, professional designers use a specific formula called “Pillow Mathematics.”
The most critical pro secret for a magazine-ready look is the sizing of your inserts: Insert = Cover + 2 inches.
This means if you have a 20-inch decorative cover, you must use a 22-inch down or gel-fiber insert. This simple trick ensures your pillows look plump and luxurious rather than saggy.
When arranging your pillows, think of building a triangle that decreases in size as it moves toward the center of the bed.
Start with two large sleeping pillows propped vertically against the headboard as your base. Next, layer on your Euro shams (typically 26×26 inches) to provide height and a backdrop for color.
For a King or Queen bed, the arrangement should feel balanced but not necessarily identical on both sides.
To finish, give each decorative pillow a “karate chop” in the center of the top edge to create a soft indentation: this small touch signals that the bed has been personally styled.
| Bed Size | Back Layer | Middle Layer | Front Layer |
| Queen | 2 Euro Shams | 2 Standard Shams | 1 Decorative Square or Lumbar |
| King | 3 Euro Shams | 2 King Shams | 1 Extra Long Lumbar or 2 Squares |
6. Throws and Foot-of-Bed Anchors
The final layer of the five-layer foundation is the accent layer: the throw blanket. This is purely expressive and is the perfect way to introduce “movement” into the room.
Designers generally choose between two styling methods: the “Structured Fold” or the “Organic Drape.”
For a formal, hotel-like appearance, fold your blanket into a long strip and lay it perfectly horizontally across the bottom third of the bed.
If you prefer a relaxed, lived-in elegance, toss the throw casually over one corner of the foot of the bed so it trails slightly toward the floor.
To truly anchor the bed as the centerpiece of the room, consider the furniture at its foot. A bench, ottoman, or a pair of stools provides a visual finish line for the entire bedscape.
Designers are opting for upholstered benches in natural materials like boucle or woven leather. These pieces are not just for show: they serve as a practical place to store your decorative pillows at night, making the ritual of unmaking the bed much easier.
Ensure the height of your furniture is slightly lower than the mattress to maintain a smooth visual flow throughout the space.
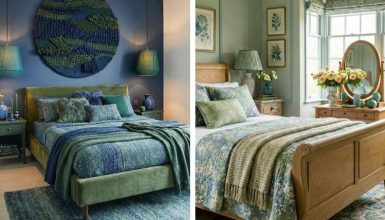
7. Color Psychology
The era of “Millennial Beige” is officially over. The new trend is all about “emotional utility”, using colors that help us feel grounded or optimistic.
The Pinterest Palette is dominated by Jade and Persimmon, two hues that offer a radical departure from neutral safety.
Jade is being treated as the “new neutral” because it is serene and sophisticated, working beautifully for “color-drenching” where the walls and bedding share the same mossy, mineral tone.
Persimmon, a warm blend of orange and red, is used to provide “Visual Contrast” and a sense of joy. When styling a bed with these bold colors, remember the rule of scale: use one large statement piece, like a Jade duvet, and then layer in smaller patterns like a floral grid or pinstripe sham.
By ensuring all your different textiles share at least one common color, the bed will look curated rather than chaotic.
This thoughtful use of color and texture does more than just look good: it creates a “microclimate” of psychological comfort that lowers cortisol levels and signals to your brain that it is finally time to rest.
